Monday, January 21, 2013

Emma's Apron

 My 9 r. old granddaughter, Emma, made an apron.


Emma & I love to sew, and when we get to spend the day together, that's what we do.  She also likes to cook and didn't have her own apron, so she decided to make one. She looked through my stash and picked a "tie-dye" fabric and a solid yellow for accent.  These are both quilting type cottons.    Since I already have Butterick pattern 5426, that's what we used.  We made a combination of views B & C.  And because it's sized for adults, I removed a little here and there to make it fit Emma.


I had to help her with some of the sewing, but she did most of it.  I think it turned out pretty cute!  Most importantly, she likes it.

Wednesday, January 16, 2013

TNT Patterns

I've decided to add another item to my list of sewing goals for this year.  I want to develop a TNT (tried and true) pattern for the basics in my wardrobe. After thinking about what I wear most of the time, I came up with this list of 10.
 
1. Basic knit top (with neckline & sleeve variations)
2. Cardigan
3. Woven pull over top
4. Princess seam button down blouse
5. Loose fit button down shirt
6. Vest
7. Boot-leg trousers
8. Knit pants (slim fit & flare leg)
9. Woven pants (pull on style for linen, etc.)
10. Knit dress


This will be a big job, but once it's done, it will make sewing more enjoyable.   And quicker too since fitting a new pattern can take a lot of time. Wish me luck!
 

Friday, January 11, 2013

Tablecloth Skirt

My last post was for a tablecloth and this one is for a "tablecloth" skirt. Ha! That's totally coincidental.

I've wanted to make this skirt since I saw on Shams' blog
Thank you for sharing your pattern!


I followed her instructions as to size and sewing directions except I hemmed mine last thing.  I was almost finished with it and realized it was too long.  So I took 2" off just the long points. 

And now that I've made it, I love it! 

It fits great, hangs so nicely and it swishes when I walk :)


Since it takes over 3 yards of fabric, I made sure to pick something that's not too heavy.  This fabric is perfect for this skirt.  It's a very drapey, soft fabric, but ravels horribly, and I believe is a rayon.  I found in my stash, and I have no idea when or where I got it. There were a couple of rips in the fabric, but I was able to cut around them.


Here's a picture of the back.


Monday, January 7, 2013

Tablecloth

I made a new tablecloth for my round kitchen/dining table. 


I recently noticed that my tablecloth had a couple stains that wouldn't come off and decided I needed to replace it - whenever.  Yesterday as I was looking thru a box of fabric, for something else, I came across this 2 yd piece of red/black plaid.  It's a nice crisp fabric, right color & just big enough for a tablecloth! A fabric stash is a good thing.  So in a couple hours - ta-da, new tablecloth!

It wasn't quite big enough across, so I trimmed a little off the end and added it to the side.  And thanks to the plaid, you can't even tell where the seam is.  I trimmed a little off the corner points so they wouldn't be so long.  And instead of hemming it, I used black bias tape for the edges.  Don't you just love black bias tape! 
 
 It's cold and wintery here, so that plaid looks appropriate :)


Fabric Purchase

I went to Joann's last week & they had their "red tag" fabrics on clearance for 50% off. I always look when it's on clearance and usually find some good deals.  Here's what I got:

First, a piece of tweed suiting.  It's medium weight, very soft & pretty.  Would make real nice pants, but there was only 1 yard of it.   I could use it for a bag or maybe a vest. It was $3.00 yd.


This is 2 pieces of printed corduroy,  I got 3 yds of 1 and 3.25 of the other.  One was $3.00 and the other $3.50 yd.

I really like the printed pants I've been seeing, so the idea is to use these for pants.


This is 2 yds of lt weight denim (to use for a skirt) and 3.25 yds of med. wt. denim.  They were $3.00 yd.  The check piece is red & pink flannel.  I got 6 yds of it for $1.50 yd.  Will use it for pj pants or a quilt.


I also got a 1 yd piece of black crepe for $1.50 that is very nice.


These are all basics and at really good prices.


I also got several spools of thread at 50% off and Vogue pattern 1323.  This is the line drawing.  I plan to make the shirt for warm weather (with shorter sleeves).


Sunday, January 6, 2013

Pants

It seems fitting (pun intended) that my first post of the year is about pants.  Last year on PR, we had a year long sew-along for fitting and making pants.   I wanted to be able to easily make my own pants that fit better than RTW.   I had challenged myself to make an average of 1 pair of pants per month.  I didn't meet that challenge, but I have learned a lot and made progress.   After making a lot of muslins, looking at my backside more than I ever wanted to, and with the help of the other ladies on the sew-along, I have figured out why most RTW pants and patterns don't work for me.  Apparently I have a high round backside with a tilted waist, and this is not the typical, average shape. And I have a very long back crotch and very short front crotch.  So now I'm working on making adjustments to come up with a TNT pants pattern.

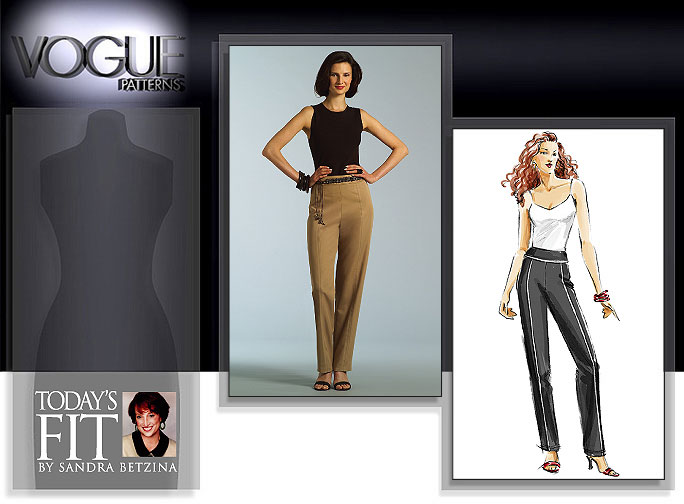
I started out with this Vogue pattern by Sandra Betzina (it's OOP now). 

This pattern came with a Craftsy class on pants fitting taught by Sandra Betzina.   The shape and fit of the waist, hips and crotch of this pattern are pretty good for me.  Much better than any other pattern I've tried, and I've tried a lot.  What I don't like: the legs are very loose, there's a seam in the center of the legs and no front zipper.   I also had wrinkles in the backside.  And when I tried to fix one wrinkle, I would get 2 more somewhere else.  After many test pairs and much slicing & dicing, I have finally come up with a pair of pants I will actually wear.  I decided to go with a wide-leg style and loose fit.  It's hard to tell in the pictures, but I used a dark purple (eggplant?) corduroy.


Here's a picture showing the pocket and the lining for the fly & waistband.  Just for fun, I used a pink zipper :)

Sunday, December 9, 2012

Sewing Goals for 2013

Here's my list of sewing goals for next year:

1. Learn to make panties.
2. Use my coverstitch machine more.
3. Blog more often.
4. Make a quilt for my bedroom.
5. Re-pad my dressform.


.

Monday, November 26, 2012

Rhonda's Free Pattern: I want to make this!

Look at this cool jacket!


It was created by Rhonda Buss and she was nice enough to share it with us.

Rhonda's Creative Life: Fabulous Free Pattern Friday


Saturday, November 24, 2012

S2633 Blue Paisley Vest


I've been so obsessed with pants since September that I've hardly sewn anything else, or actually thought about anything else.  But I did make a vest in October using this Simplicity pattern.


This vest has princess seams on the front & back-which gives it a nice fit.

The pattern also includes a shirt pattern that has a couple different neckline & sleeve options.


I used a purplish/blue paisley print flannel that I've had in my stash for a few years.  I always loved it, but it was such a small piece that I didn't know what to use it for.   I usually use a size 14 pattern for Simplicity tops, but I made this in a 16 since it looked pretty close fitting on the envelop.  I'm glad I went up a size because the 16 is a perfect fit.   The only thing I had trouble with was the ruffle collar.  I tried to line it, but it was just too bulky & I could not get it to lay right.  So I cut a new ruffle and hemmed it using my narrow hem foot - turned out pretty good.


I used a small scrap of white satin (also from stash) for the lining.


I added buttons to the "pocket" flaps.


Here's a couple close ups of the neck ruffle.


I like how it turned out; now just waiting for it to get cold enough to wear it.

Friday, October 26, 2012

Knit Top - Simplicity 3790

I made a knit top using Simplicity 3790, but I made so many changes that mine doesn't really look like the pattern. I started with view F, added the sleeves from View E, plus added a bottom band from View C.

The way I used my fabric changed the look too. I had a small piece of a print fabric leftover from another project that I like a lot.  But it was really too small to make anything.  So I decided to use the print for the front and black for the rest of the top.  And I really like how it turned out.


Since the weather was still nice, I decided to get some outside shots.  No pictures of the back as it's just a plain black top.


I made a size 14 and the fit is very good.  I made my usual alteration & trimmed a little off the shoulders.  I also lowered the neckline a little and made the sleeves longer.  I like how the neckline fits - not too wide across. I also like the gathers at the center front - just enough without being too full and loose.  Until I added the bottom band, the top was pretty short.  This pattern has four different neckline options and several sleeves choices, so a lot of variety in one pattern.

Saturday, October 6, 2012

Nook Cover

I finally finished my Nook cover and I love it.  It protects my Nook, it makes it easier to hold, plus it's so pretty!  Before starting, I looked at a lot of different styles and decided I wanted a cover that looks and opens like a book.   The problem I had was what to use on the corners that would hold the Nook in place. I tried making fabric corners and different size elastic.  Then a friend suggested using narrow elastic headbands. I got mine at the Dollar Tree - a package of 8 for $1.00.  They're about 3/8" wide and come a lot of different colors. I cut 1 band into 4 equal size pieces, and it worked perfectly for the corners.  I used fusible fleece batting to make the cover padded, and used plastic craft canvas for support and body.  To hold it closed, I added a flap with a strip of velcro.  When I'm holding it like a book, I can fold the cover back, and the velcro holds it in place.  It's also rigid enough that it can be stood on its edge.  Which is handy when I'm reading a recipe from it while cooking.  Overall, I'm very pleased with how it turned out.


Friday, September 7, 2012

Another Handbag-McCalls 6579


After making the last bag, I was still in the mood to make another one.  For this one, I started with M6579, view C, but cut it with 3 sections like in view A. 


The bags in this pattern are fairly large.  The view I used is for a bag that's 16" wide x 15".  I reduced the size for mine and made it 13-1/2" wide x 12" tall.  I added a small inside zippered pocket and 2 outside zippered pockets.  The small outside pocket is between the straps & I use it for my cell phone and keys.  In order to make the pocket on the other side larger, I stopped sewing the straps a little lower down. I use this pocket for papers, receipts, coupon, etc. I really like the top edge of the bag; the way that it's curved & how the zipper is attached.  This is a Nancy Zieman pattern, so the instructions are very good.


The fabric I used was a panel I picked up at a local fabric/craft outlet.  For the lining, I used some home decor fabric leftover from another project.  I like how the pattern is divided into 3 pieces.  Cutting like this allowed me to utilize the fabric panel in such a way as to highlight the colors best.  I attached the straps in between the bottom 2 pieces and inserted the zippered pockets in between the top 2 pieces.  For the straps I used 1" wide cotton webbing from Joann Fabrics and 1" silver "D" rings. 

I really like how the bag turned out.  It's just the right size and the fabric is so pretty.


Friday, August 10, 2012

Bucket Bag

I entered another contest on Pattern Review.  This was a 2 week challenge contest to make a handbag.  Since I had never made one, I decided I wanted to try a bucket style bag.  

Inspirations for my bag.


I like the combination of
different fabrics and leather.


I like the straps on this one.


My Review


Description: A bucket bag style handbag.

Size: Finished size is 11 inches tall, 15-1/2 inches wide at the top, with a 7 inch bottom. The straps are 1-1/2" wide and 24" long. I added 2 inside zipper pockets and 2 small zipper pockets on the outside. I use the inside ones for papers, receipts, etc. and the outside ones for keys and cell phone.

Fabric Used: I used upholstery fabric for the body; vinyl for the bottom, straps and a 2" wide strip along the sides; and a brown twill for the lining. The vinyl was easy to sew, but the needle made little holes in it. So if (or when) I made a mistake, it shows up. No way to undo that, so I just try not to see it To add more interest, I cut the bag with the design of the fabric running crossways on one side. On the other side I turned it to run the design up and down, plus added a 2 inch wide strip of the vinyl along the sides. The tacks on the straps are purely decorative. I use some antique brass upholstery tacks I found in my supplies. I pushed them through & bent over the backs to hold them in place. I used small pieces of the vinyl to make ends on the zipper.

Pattern Used: I didn't have a pattern for this style bag, so I drafted my own.

Did it look like the photo once you were done sewing with it? Yes, it turned out like I had envisioned.

Conclusion: I love making handbags. It's great to be able to make it the size I want with the pockets I want and the straps the length I want. I don't normally use a pattern, just have an idea and then make it up as I go along. Sometimes this works out & sometimes not. But overall, I'm pleased with how this one turned out.


Now the pictures of my bag:


Tuesday, July 17, 2012

Simple Skirts - No Pattern Required

I made 2 really simple skirts. 

The first one is a knit maxi. I cut 2 rectangles to total a little bigger than my hip measurement & long enough to hem and add an elastic waist casing.  Next time, I will make it one piece with the seam up the back & leave a walking slit.  I've worn this to work & it is super comfortable, and I love the floral print.


Next up is a skirt I made from a cotton woven remnant I found in my stash.  Same method as the first except I made it a little bigger since it's a woven & has no stretch.  And since it wasn't quite long enough, I added a piece of gathered eyelet to the hemline, also found in my stash. Yellow is one of my favorite colors & I love the old-fashioned look of the fabric combined with the eyelet.  I haven't worn this yet, but I'm sure it'll be cool for these hot days we've been having.